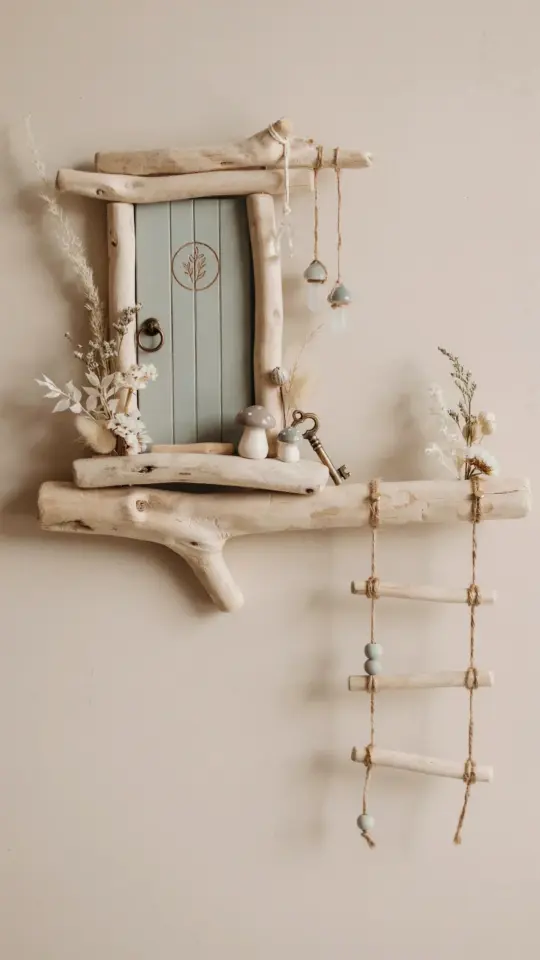
Here’s the thing about fairy doors: you don’t need a fancy craft store haul to make something magical. Last weekend, I built a little pistachio green fairy door for my cottage garden nook, and the whole thing cost me exactly zero dollars. That’s the beauty of this project, it leans hard into natural materials you can collect on a simple walk, and it satisfies that FairyDoors craving without touching your wallet. I’ve been obsessing over miniature cottage style details for years, and this is honestly one of my favorite Handmade projects yet.
The trend right now isn’t gluing plastic gems to a prefab frame. It’s about texture. It’s about imperfect edges and earthy tones that blend into the ivy and moss. So if you’re ready to get your hands dirty with some free supplies and a hot glue gun, let me show you exactly how I made this BudgetDIY magic happen. No fancy tools required. And no, you don’t have to be a woodworker either.
Why Pistachio Green Is the Perfect Cottage Style Choice
Look, I could have painted my door a dusty pink or a classic lilac, but the pistachio shade just hits differently. It’s pale enough to feel soft and wistful, but it still holds its own against the deep greens of ferns and hostas. This muted, slightly dusty green is having a real moment in cottage garden design. It mimics the color of unripe pistachios, obviously, but it also echoes the silvery underside of olive leaves.
The best part? You can mix this color for free using leftover house paint. I had a tiny pot of sage green emulsion and a squirt of white chalk paint in my shed. I mixed them until the tone looked like soft butter with a hint of matcha. It’s a lot more forgiving than a saturated color, so if your door edges are a bit rough, the imperfections just read as character.
Honestly, the specific shade matters less than the finish. A matte or eggshell finish absorbs light and makes the wood look naturally aged. I’ve seen people use gloss paint on fairy doors, and it always screams “craft project” instead of “tiny enchantment.” You want a whisper, not a shout.
Foraging for Your Natural Fairy Door Materials
Before you spend a single cent, hit the woods, the hedgerows, or even a messy patch of your own backyard. I did my foraging after a light rain, which makes the bark and moss look richer and smell incredible. You are looking for flat pieces of bark (pine or birch works beautifully), sturdy twigs, and dried moss that isn’t crumbling to dust.
Here’s what I gathered for my pistachio green door:
– A wide, flat slice of birch bark for the door slab
– Thick, gnarly twigs for the door frame and the arch
– A handful of reindeer moss for the base and “garden” around the door
– A few tiny acorn caps for decoration
– One curved piece of driftwood to use as the handle
That’s it. Just six natural items turned into a whole scene. When you’re foraging, remember to only take what’s already fallen. Don’t strip bark off a living tree, that’s just rude, and it kills the tree. Check any collected items for bugs too. You do not want a surprise spider colony moving into your garden nook.
How to Make a Pistachio Green Door With Bark
Alright, let’s get into the build. The first step is to prep your bark slab. I gently wiped mine down with a dry cloth to remove the loose dust. If your bark is curling at the edges, you can press it flat under a heavy book for a day or two, but honestly, a little curve in the door makes the cottage look older.
Now, grab your mixed pistachio green paint. I used a small foam brush and applied two thin coats. Let the first coat dry completely before you slap on the second one. The wood grain will soak up the paint unevenly, and that is exactly what you want. It creates a beautiful, weathered patina that you can’t fake with a straight-out-of-the-tube color.
While the paint dries, build the frame. I hot glued two straight twigs vertically and one horizontally across the top to form a simple arch. Try to keep the frame slightly larger than the door leaf itself. You want the door to look like it actually fits inside a stone opening, not like a trophy mounted on a board.
Adding the Woodworking Details on a Budget
Once your green paint is dry, it’s time to add the hardware. But skip the store-bought hinges. Seriously. I used small, dark brown twigs, cut into one-inch pieces, and glued them near the top and bottom edges of the door. They look exactly like rustic iron hinges from a distance. For the handle, I glued that curved piece of driftwood to one side, it looks like a skinny, wizened knob.
The trick here is to use real pressure when you glue. Don’t just dot the glue on and hope it sticks. Apply a generous line of hot glue, press the twig into place, and hold it for a full thirty seconds. This is the step where most DIY fairy doors fail. People rush the adhesion, the pieces fall off in a week, and then they say the project was a waste of time.
You can also scratch some vertical grooves into the bark before painting if you want a plank-door effect. I used the back of a butter knife to score a few lines. It took two minutes and makes the door look like it has actual beams. For a more polished look, sand the edges with fine grit paper, but if you’re going for that grungy forest vibe, leave them rough.
Creating a Dreamy Miniature Garden Nook
A fairy door is nothing without a surrounding scene. You can’t just lean it against a wall and call it a day. I fixed mine in the root cavity of an old oak tree, but a large flower pot or the base of a hedge works just as well. Build a small mound of soil or pebbles to set the door into, which gives it that “buried” look.
Then, glue on a base of reindeer moss. You can find this at most dollar stores, but I dried my own from the woods. It’s shockingly easy. Layer the moss up against the bottom of the door frame. I added a stepping-stone path using small, flat pebbles I painted white. It leads from the door right down into the begonia bed.
Here’s where you can get creative and add the “lived-in” details. I scattered a few acorn caps around the base, like tiny pots, and placed a small, broken terracotta shard as a doorstep. Some people add a little lantern or a tiny wooden sign. Don’t overdo it though. The goal is to make it look discovered, not decorated. Less is definitely more.
Easy Finishing Touches and Weatherproofing
To make your pistachio green door survive the rain, you need to protect it. I brushed on a thin coat of matte Mod Podge, but you can also use a clear outdoor sealant spray. This seals the paint and the bark, preventing the color from washing out or the wood from rotting too quickly. If the door sits directly in the soil, place a small rock behind it to keep the moisture away from the base.
One thing I wish I knew: use waterproof glue if you have it. Hot glue works for dry climates, but it can weaken in high humidity. I upgraded to a heavy-duty exterior adhesive for the base pieces. Honestly, hot glue is fine for a temporary look, but if you want this to last the whole season, spend the two dollars on a proper glue gun stick.
Finally, step back and look at the proportion. Is the handle too big? Is the frame too heavy? Sometimes you need to take a craft knife and shave down a twig. I had to trim my door because it was sticking out too far from the tree root. A quick slice, a dab of paint, and it fit perfectly.
Why This Handmade Project Beats Store-Bought
I’ve seen fairy doors in garden centers selling for forty bucks, and they look like plastic toys. This little pistachio door has so much more soul. It’s rough around the edges, it smells faintly of pine, and no one else on the street has one like it. That’s the real reward of a Handmade project like this.
Plus, you are practicing NaturalMaterials style in the truest sense. You are creating a feature that cycles back into the earth when it eventually breaks down. Sure, the paint isn’t biodegradable, but the bulk of it will return to nature. That feels way better than buying a resin mold made in a factory overseas.
This is an easy afternoon project for anyone, even if you think you are not crafty. I promise, if you can glue a stick to a piece of bark, you can do this.
Alright, I hope you give this a try and show off your own little cottage corner. It’s such a sweet, low-pressure way to add a bit of fantasy to your garden. If you do make one, I’d love to hear about your color choice or what materials you foraged. Drop a comment and tell me where your fairy door ended up. I might just be looking for inspiration for my next one. Happy crafting.
#FairyDoors #Handmade #BudgetDIY #NaturalMaterials #CottageStyle