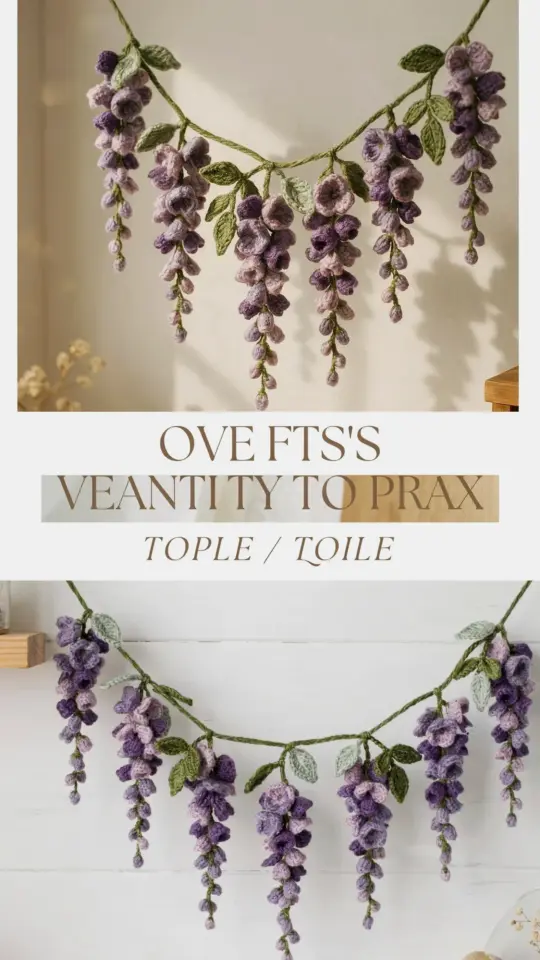
You know that moment when you’ve spent three evenings crocheting wisteria flowers, and then you hang the finished garland on your door, only to watch it stick straight out like a frightened cat’s tail? That’s not the dreamy cottage look you saw on Pinterest. The culprit is usually one thing: bulky yarn. The whole point of crochet wisteria door garland ideas is movement, and you can’t get movement from a yarn that refuses to bend. The good news? This is completely fixable, and honestly, it’s the easiest mistake to avoid once you know what to reach for.
Let me walk you through the common traps and how to get that soft, dripping wisteria effect. Because a door garland should feel like a gentle waterfall of petals, not a bristly doormat standing upright.
Why Bulky Yarn Turns a Wisteria Garland Into a Stick
Bulky yarn has one job: to hold its shape. That’s great for baskets and chunky blankets, but it’s the absolute worst thing for hanging flowers. Wisteria cascades, it sways in the wind, and it tucks gently against the doorframe. A thick yarn gives you flowers that point straight out and refuse to drape.
I made this mistake on my first attempt. I grabbed a worsted-weight acrylic from my stash because I wanted the garland done fast. It took me a week to admit the result looked more like a series of tiny hats on a string than wisteria. The stiffness wasn’t just a small flaw; it changed the entire silhouette. When the petals don’t fall downward, you lose the natural teardrop shape that makes wisteria so recognizable.
Here’s the thing: hook size matters just as much as yarn weight. Even with a lighter yarn, if you use a hook that’s too small, your stitches get tight and the garland becomes a coiled rope. You want a relaxed tension. The fabric should feel soft and almost floppy before you even add it to the door.
Best Yarn Weight for a Soft Hanging Wisteria Garland
Look, you don’t need to go to lace weight to get this right, but you do want to stay in the light to fingering range. A sport weight or fingering weight cotton blend works beautifully. Cotton gives you a little bit of structure for the flower petals, but the lighter weight means gravity can actually pull the garland downward.
My personal favorite is a DK weight cotton that’s slightly mercerized. Mercerized cotton has a subtle sheen, and it makes the wisteria petals look a bit like silk. But DK weight is where you should draw the line. If you’re a tight crocheter, even a DK might feel stiff, so you might prefer fingering weight with a 3.5 mm hook. For reference, I use a 3.25 mm hook with fingering weight for most of my wisteria patterns. That gives me petals that are defined but still soft enough to bend.
One thing to keep in mind: lighter yarn means more flowers. You’ll need to make more individual blossoms to fill the same space. That’s not a bug, it’s a feature. The density of those small flowers is what creates that lush, full look without the bulk.
What to Look for in Free Crochet Wisteria Patterns
Not free crochet patterns are created equal. Some will lead you straight into the stiff-garland trap without warning. When you’re searching for a wisteria garland pattern, check the recommended yarn weight before you even look at the flower photos. If it calls for worsted weight or anything labeled “chunky,” run the other way.
The best patterns share a few common traits:
– They suggest fingering or sport weight yarn.
– The flowers are worked in rounds or short rows, never tall dense cylinders.
– Leaves are attached with a long tail so they can dangle and twist.
– The garland base is either a long chain or a series of small rings, not a solid tube.
Also, look for patterns that show you how to block the finished garland. Blocking is not just for lace doilies. A light steam or wet block can relax your stitches and instantly make the garland drape better. Some free patterns skip this step, which is a shame, because it’s the difference between an okay garland and one that makes your neighbors stop and ask where you bought it.
Assembly Tricks That Keep the Flowers Flowing
So you’ve picked the right yarn and finished crocheting all those tiny petals. Now comes the part that most tutorials gloss over: putting it together. How you attach the flowers to the main cord determines whether you get a cascade or a clump.
First, don’t attach every flower the same way. Alternate between flowers that hang straight down, flowers that angle slightly left, and flowers that angle right. This gives the garland a natural, organic feel. Wisteria in nature doesn’t grow in perfect vertical lines, so neither should yours.
Second, space them out like a real wisteria vine. The flowers cluster near the top and taper as they go down. If you space everything evenly, it looks like a beaded curtain, not a vine. Start dense at the top and let the spacing widen gradually.
And here’s a weird little trick I learned after much trial and error: add a few extra flowers to the back of the garland. Not the front. The back. When the garland hangs against a door, you’ll see it from an angle, so the back flowers create depth and make the whole thing look fuller without making it heavier.
Shaping Mistakes That Make Wisteria Look Like a Cactus
The biggest shaping mistake is making the flower petals too uniform. Wisteria petals are long and narrow, curling slightly at the tip. If you use a pattern that gives you round puffy circles, you get something that looks more like a bunch of grapes or, honestly, a weird cactus with vines.
Watch your stitch count in the petals. A proper wisteria petal often uses a few chains at the start, then single crochets and half doubles that taper down. If the pattern tells you to make all petals the exact same length, you’ll lose the variety that makes wisteria look real. Mix in some shorter petals around the edges and a few longer ones in the middle.
Another easy mistake is not leaving enough length between the flowers. If your connecting chains are too short, the flowers bunch up into a tight ball. Give each flower a little breathing room. The chain between flowers should be at least a few inches long, so that when you hang it, there’s visible space that lets the eye follow the line of the vine.
Cottage Door Styling Without the Bulk
Now that you have a soft, cascading garland, how do you style it without ruining the effect? The whole point of cottagecrochet decor is charm, not overwhelm. Hang the wisteria so it drapes over the top of the door and falls naturally down one side. Don’t stretch it tight across the top like a banner. Let it sag gently, like a real vine.
If you’re adding other elements, keep them light. A small wooden sign or a simple bow is enough. The wisteria should be the star. I tried pairing mine with a thick eucalyptus garland once, and the result was too busy. The two vines fought for attention, and the wisteria got lost. Now I keep it solo, or at most with a few small faux ferns tucked behind.
One more thing: check the weight of the finished piece. If you’ve crocheted a long garland with hundreds of flowers, it could get heavy enough to pull down a thumbtack or a weak command hook. Use a sturdy nail or a wreath hanger designed for heavy doors. There’s nothing worse than your beautiful garland crashing to the porch floor because the adhesive gave up.
The fix for all of this is simple: choose your yarn like you mean it. Take the extra time to work with a lighter weight, and your wisteria will reward you with that soft, romantic cascade you’ve been scrolling for. You’ll get compliments, and you might even get asked for the pattern.
Go ahead, make a small test strand first. Crochet five flowers in fingering weight cotton and hold it against your door. Then do the same with a worsted weight. You’ll see the difference in seconds, and you’ll never reach for bulky yarn again. Happy crocheting, and may your wisteria always flow like water.
Leave a Comment